Lee Graduated ND Filters: a quick review
18 July 2013
In an era were the common people, and the common photographers as well, think that you can fix everything with Photoshop, talk about filters it might sounds a bit out of time, retro' if you like it, vintage if you are a feckin hipster, but while some filter can be easily replicated with Photoshop, obtaining the same result or even better, there are some filter that are irreplaceable, like polarizers and ND filters.
You can cheat as much as you want, but those two types of filter cannot be faked.
As I mentioned before, I bought the Lee Big Stopper a few months ago, and I absolutely love it. Quality is brilliant, and 10 stops of light reduction can turn any boring waterways to something amazing. But the problem when it comes to landscape photography, is that you never have an even exposure, you expose for the sky or for the foreground, is one or the other, you cannot have both.
So which options do you have? Well, with two exposures, you can merge them later in photoshop and give the illusion that it's one shot, I did it a billion of times, and most of them it gives a good results, some others not that good. So yesterday I went to one of the local camera shops (after comparing prices online, and when I see that the price is similar, I prefer to buy from local shops), and as I already had the Lee system, I bought the Lee Graduated ND Filters Kit (the hard edge as they are perfect for landscape as I always have a clear line of horizon) which has three different filters:
- Hard 0.3 ND (-1 stop)
- Hard 0.6 ND (-2 stops)
- Hard 0.9 ND (-3 stops)
And just after work I went straight away on one of my favourite places in Dublin, Seapoint, a nice place just above Dun Laoghaire, and a few stops with the Dart from where I live, and I did some quick tests.
Bear in mind that shooting with these filters is definitely not who is in hurry, everytime you have to accurately compose the shoot, with your camera on a tripod, take the metering for the foreground (which is going to be your exposure), than take the metering for the sky, see how many stops of difference you have, then pick the right ND filter, place it on the holder, move it to the right position, and then shoot.
So, I put my camera on the tripod, framed, focused, exposed for the foreground, and then snapped. And this is shot, I did not processed in any way, it's the RAW file exported to JPG, that's it.

As you can see it was a bit cloudy, so I didn't get the harshest conditions, but if you look close to the horizon on the right, there is a big overexposed area and other smaller areas where the clouds are thinner, which you can bring the highlights down with lightroom, but in most of the cases that area is irrecoverable, especially if you have a clear sky.
Then I slided in the first filter, the 0.3 ND Grad, and took another shot.

Now the sky is one stop darker than the foreground, the transition is invisible, and I get much more details out of the clouds, and I already have no areas burned on the highlights. But let's keep going, and see what happen with the next filter, the 0.6 ND, which is going to bring down the light by 2 stops:

As you can expect, the sky is way darker, I have all the details I want, maybe too much, but I prefer to have I situation like this one, where I can always increase the exposure later, and still keep all the details, rather than have a burned sky.
Now let's see what happen with the last filter, the 0.9 ND, which is equal to 3 stops of light loss.

Maybe here is too dark now, the edge of the filter starts to be quite evident, and a 3 stops of light (actually, of dark) is too much here, but again, as you have all the details of the sky, you can always bring exposure of the sky back up, so not a huge problem.
Then I decided to take another photo, and I went a bit extreme: I've added to the 0.9 ND, the Big Stopper, so I had -10 stops for the foreground, and -13 stops for the sky, and this is the result:
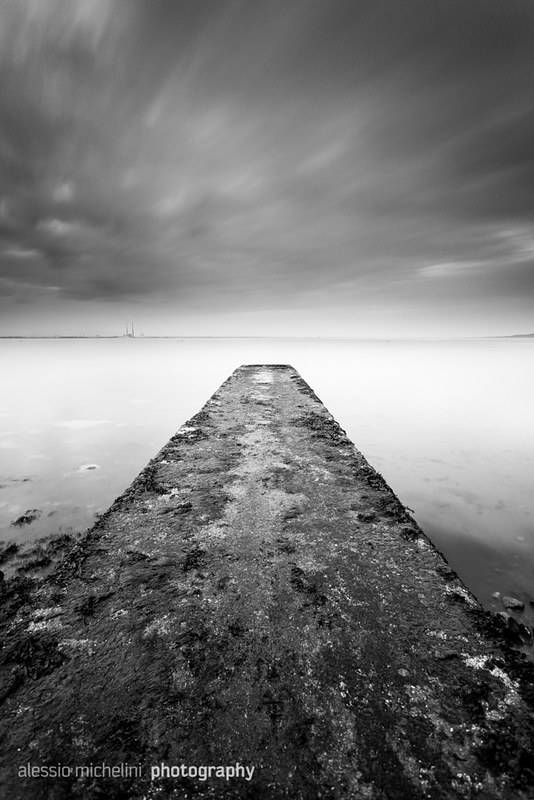
Not bad as a first test, isn't it? So, for the moment I'm pretty happy with these filters, they are not made of glass like the big stopper, but I think is some kind of resin, but� the quality is�still pretty good, as you would expect from this brand. They are a bit pricey, as one single filter costs around 90 euro, and the set with the three filters costs about 220 euro, but they are an important piece of equipment if you are into landscape photography that you cannot miss, like the tripod and the remote.
Hopefully in the very next future I'll post some other pictures taken with these filters.